
How to Cut a Model in OrcaSlicer
June 19, 2026
Split a model in OrcaSlicer with the Cut tool: slice along a plane, keep one or both halves, and add connectors so the pieces fit back together.
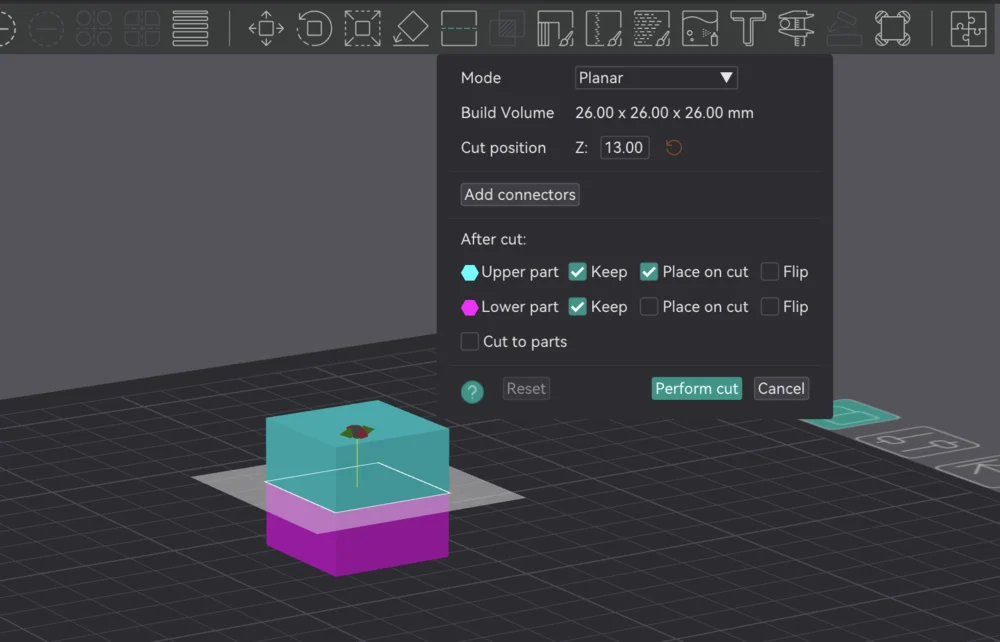
To cut a model in OrcaSlicer, select it and use the Cut tool from the toolbar on the left of the 3D view. Position the cutting plane, choose which part to keep, and apply. OrcaSlicer splits the mesh along that plane.
Make the cut
- Click the model to select it.
- Choose the Cut tool from the left toolbar.
- Position the cutting plane: drag it, or set a height and angle for a precise cut.
- Choose what to keep: the upper part, the lower part, or both.
- Optionally enable connectors so the pieces register and glue together cleanly.
- Apply the cut.
The pieces drop onto the plate as separate objects you can arrange and print.
When to cut
- Fit the build volume: split a part that is too tall or wide to print in one piece.
- Better first layer: cut to create a flat face to sit on the bed, improving adhesion and often removing the need for supports.
- Print in sections: break a large model into assembled pieces.
Cutting only changes geometry; your process, filament, and printer settings still apply to the resulting pieces.
Why this matters for a print farm
Splitting oversized parts to fit the bed, or to print without supports, is a routine production decision. Once a part is cut and dialed in, that prepared version should be the one every machine prints, not something re-cut by hand each run.
Printago keeps each part's prepared geometry and settings together and slices in the cloud with OrcaSlicer or Bambu Studio, so a cut, support-free part prints consistently across the queue. See print farm slicing.
Frequently asked questions
Sign up for free today
No credit card required. Connect unlimited printers and get production automation running in minutes.