
How to Send a Print to Your 3D Printer From a Chromebook
November 2, 2026
Send a print to your 3D printer from a Chromebook. What must be connected first, how to queue the plate you sliced, and when to use an SD card instead.
To send a print to your 3D printer from a Chromebook, connect the printer to Printago first, then slice in Printago Studio and click Add to Printago queue. Printago sends the job to the printer from there. Desktop slicers usually do this job, but they don't install on most Chromebooks, and many managed devices block the Linux environment. So the connection has to come from somewhere other than the Chromebook.
What must be connected first?
You need a Printago account, a connected printer and a material. Printers connect from the Connections page in one of two ways:
- Bambu Cloud Connection. Sign in with your Bambu account and nothing gets installed, so a Chromebook can do this alone. It's limited to X1, P1 and A1 models on older firmware, with Cloud Mode on.
- LAN Connection. Printago Fuse is a small client on your local network, for all printers. Its downloads are for Windows, Mac and Docker, with no ChromeOS build. It has to run on another computer or a Docker host, such as a Raspberry Pi, on the printer's network.
Then add your filament under Printing > Materials, because the queue matches jobs to materials you stock. Each material needs a slicing profile for your printer model and nozzle size, or jobs won't match.
Queue the plate
- Open Printago Studio from the sidebar.
- Open your file and click Slice plate 1. See how to slice on a Chromebook if this is your first plate.
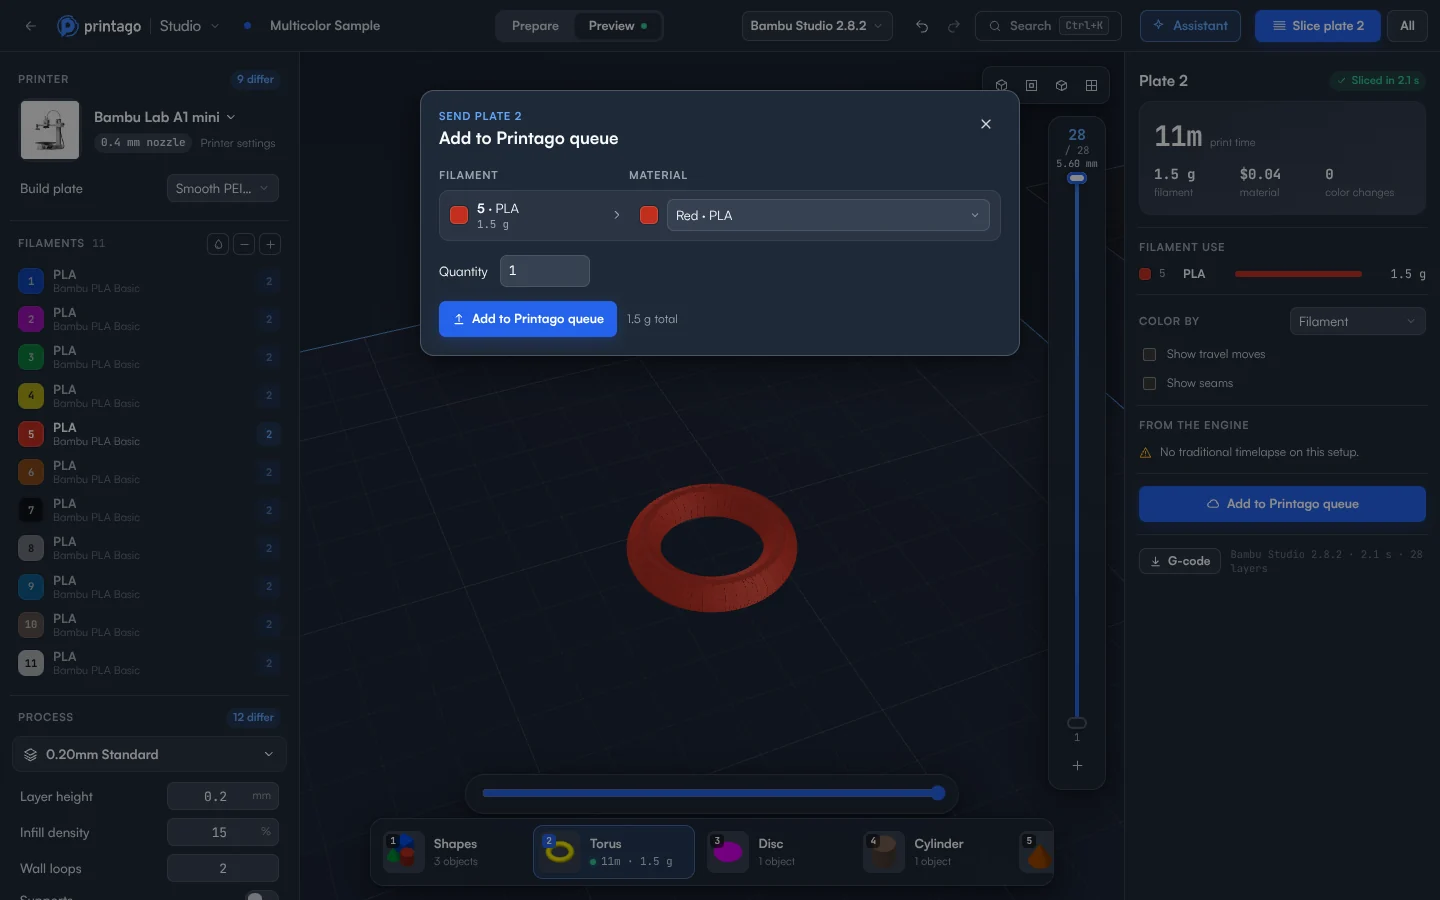
- In the Preview panel, click Add to Printago queue. The button appears once the slice matches the plate.
- For each filament, choose the material. Printago Studio suggests the closest color of the same type. If you have none of that type, it says which type is needed and won't send.
- Set the Quantity. The dialog shows the total filament.
- Click Add to Printago queue, then View queue.
The job waits until a printer is online, free, and marked clear and ready for the next print. The print queue picks the machine for you.
What actually prints?
The queue prints the G-code you previewed, without slicing it again. To do that, Printago Studio creates a new part named after the project and plate, and the part you opened doesn't change. Because that part is already sliced, it prints only on the printer model you sliced for.
Want any compatible printer to take it? Save your changes to the part with File > Save to Printago, or File > Save as new part in Printago… for a file from your Chromebook. Then click Send to Queue on the part. The queue slices it for the printer it lands on. That also helps with cost: you get 60 minutes of cloud slicing and rendering time a month free, and more on a paid plan, and jobs sliced by your print queue don't count.
Other ways to print
G-code in the Preview panel downloads the plate for an SD card. If your role can't create parts, as with the Student role, see school Chromebooks.
Printago is 3D print farm software that runs production from order to finished print. One Chromebook can feed every printer you connect. Read more on the print queue and Printago Studio in the docs.
Create a free Printago account and connect your first printer.
More Chromebook guides
Read the Printago Studio, or browse all slicer guides.
Frequently asked questions
Sign up for free today
No credit card required. Connect unlimited printers and get production automation running in minutes.